728x90
반응형
SMALL
이번 포스팅에서는 Spring boot의 뷰 템플릿 엔진인 Thymeleaf의 기본 구조와 사용법을 알아본다.
Thymeleaf ?
Tymeleaf(타임리프)란 spring boot에서 지원하는 공식적인 View Template 엔진이다.
html 태그에 속성을 추가하여 컨트롤러가 전달하는 데이터를 이용하여 동적으로 화면을 구성한다.
Thymeleaf 적용 방법
1. Maven 설정 (pom.xml에 추가)
<dependency>
  <groupId>org.springframework.boot</groupId>
  <artifactId>spring-boot-starter-thymeleaf</artifactId>
</dependency>
2. application.properties 설정
spring.thymeleaf.cache=true
//타임리프 사용여부
spring.thymeleaf.enabled=true
//타임리프 경로 설정
spring.thymeleaf.prefix=classpath:/templates/
//뷰 기본파일 확장자
spring.thymeleaf.suffix=.html
타임리프는 html 파일을 수정하고 확인할 때 서버 재실행을 해줘야 하는데,
spring.thymeleaf.cache=false로 설정할 경우 새로고침만 해도 저장된다.
(단, 실제 운영환경에 반영할 때는 true로 설정해야 한다.)
Thymeleaf 폴더 구성
타임리프 엔진을 추가하여 프로젝트를 만들면
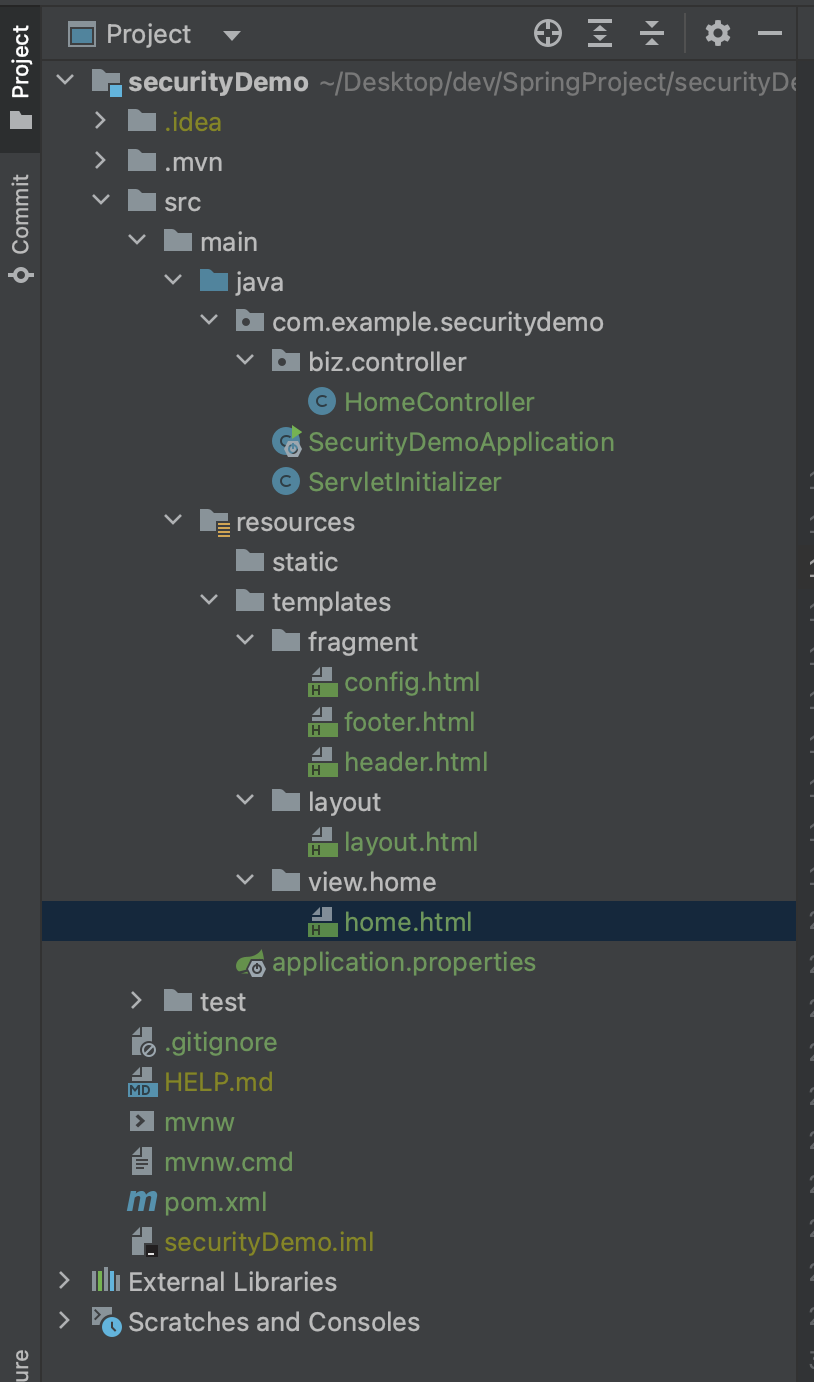
기본적으로 Resources 폴더 밑에 static과 templates 폴더가 생긴다.
- Static 폴더는 js, css, image 파일같은 정적인 파일들이 위치한다.
- templates 폴더는 view 파일들이 위치한다.
Thymeleaf 레이아웃 설정

resource > templates 밑에 layout, fragment, view 패키지를 생성한다.
- layout 패키지 밑에 layout.html 파일을 만든 후 생성된 내용을 지우고 아래 내용을 입력한다.
<!DOCTYPE html>

<html lagn="ko"
      xmlns:th="http://www.thymeleaf.org"
      xmlns:layout="http://www.ultraq.net.nz/thymeleaf/layout">
<head>
    <!-- Required meta tags -->
    <meta charset="utf-8">
    <meta name="viewport" content="width=device-width, initial-scale=1, shrink-to-fit=no">

    <title>Hello, world!</title>
    <!-- config fragment 사용 -->
    <th:block th:replace="fragment/config :: config" ></th:block>
</head>

<body>
    <div class="main-contents">
      <!--Header-->
      <th:block th:replace="fragment/header :: header"></th:block>
      <!--Contents-->
      <th:block layout:fragment="contents"></th:block>
      <!--Footer-->
      <th:block th:replace="fragment/footer :: footer"> </th:block>
    </div>
</body>
</html>- fragment 패키지 밑에 공통으로 사용할 레이아웃 요소를 정의하며, config.html, headr.html, footer.html 파일을 만든다.
- config.html 은 공통으로 사용할 css, js 를 선언해준다.
<html lagn="ko"
      xmlns:th="http://www.thymeleaf.org"
      xmlns:layout="http://www.ultraq.net.nz/thymeleaf/layout">

<!--configFragment 선언-->
<th:block th:fragment="config">

    <!-- 이 영역에 공통으로 사용할 css, js library를 선언한다. -->
    <link rel="stylesheet" href="/common/common.css" th:href="@{/common/common.css}">
    <link rel="stylesheet" href="/common/style.css" th:href="@{/common/style.css}">

    <!--Scripts-->
    <script th:src="@{/js/jquery-3.5.1.min.js}"></script>
    <script src="https://cdn.jsdelivr.net/npm/jquery@3.5.1/dist/jquery.slim.min.js" integrity="sha384-DfXdz2htPH0lsSSs5nCTpuj/zy4C+OGpamoFVy38MVBnE+IbbVYUew+OrCXaRkfj" crossorigin="anonymous"></script>
    <script src="https://cdn.jsdelivr.net/npm/bootstrap@4.6.2/dist/js/bootstrap.bundle.min.js" integrity="sha384-Fy6S3B9q64WdZWQUiU+q4/2Lc9npb8tCaSX9FK7E8HnRr0Jz8D6OP9dO5Vg3Q9ct" crossorigin="anonymous"></script>

    <!-- Content Page의 CSS fragment 삽입 -->
    <th:block layout:fragment="css"> </th:block>

    <!-- Content Page의 script fragment 삽입 -->
    <th:block layout:fragment="script"></th:block>
</th:block>
</html>
<html lagn="ko"
xmlns:th="http://www.thymeleaf.org"
xmlns:layout="http://www.ultraq.net.nz/thymeleaf/layout">
<body>
<header th:fragment="header">
<div id="header">
<!--Header 영역-->
</div>
</header>
</body>
</html><html lagn="ko"
xmlns:th="http://www.thymeleaf.org"
xmlns:layout="http://www.ultraq.net.nz/thymeleaf/layout">
<!--footerFragment 선언-->
<body>
<footer th:fragment="footer">
<div id="footer">
<!--Footer 영역-->
</div>
</footer>
</body>
</html>- contents 영역 (home.html)
<!DOCTYPE html>
<html xmlns="http://www.w3.org/1999/xhtml"
      xmlns:th="http://www.thymeleaf.org"
      xmlns:layout="http://www.ultraq.net.nz/thymeleaf/layout"
      layout:decorate="~{layout/layout}">

<th:block layout:fragment="config">
    <title>Spring Boot</title>
    <!--/* css */-->
    <link th:href="@{/css/common.css}" rel="stylesheet" />
</th:block>
<body>
    <th:block layout:fragment="header" th:include="@{/fragments/header}"></th:block>

    <div layout:fragment="content" class="content">
        <h2>This is Content</h2>
    </div>

    <th:block layout:fragment="footer" th:include="@{/fragments/footer}"></th:block>
</body>
</html>
컨트롤러 생성
package com.example.securitydemo.biz.controller;

import org.springframework.stereotype.Controller;
import org.springframework.web.bind.annotation.GetMapping;

@Controller
public class HomeController {
    @GetMapping("home")
    public String home() {
        return "view/home/home";
    }
}
실행 후 localhost8080:/home 접속 후 확인
728x90
반응형
LIST
'Web Application > Spring boot' 카테고리의 다른 글
| [spring] Spring Security + JWT로 인증/인가 기능 구현하기(1) (0) | 2023.03.28 |
|---|---|
| [spring] Oauth2 (1) - 네이버 로그인 SDK를 사용하여 로그인 기능 구현(네아로) (0) | 2023.03.22 |
| [spring] 간편결제 - 네이버페이(naver pay) 결제 api (1) 결제 기능 구현 (1) | 2023.03.18 |
| [spring] 간편결제 - 카카오페이(kakao pay) 결제 api (1) 단건결제 기능 구현 (3) | 2023.03.18 |
| [spring] 1. IntelliJ를 이용하여 Spring boot 프로젝트 생성 (0) | 2023.03.05 |


